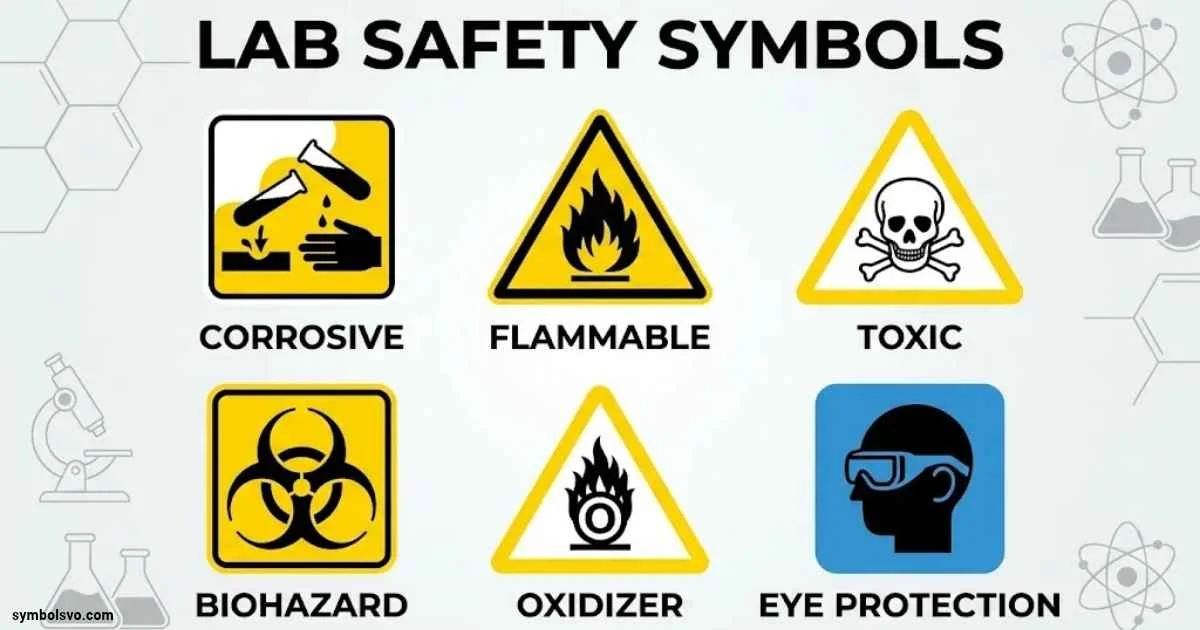
Laboratories contain chemicals, biological materials, specialized equipment, and substances that can harm people when handled incorrectly. Even a routine experiment can become dangerous if someone overlooks an important warning. That’s why lab safety symbols play such an essential role in scientific workplaces.
These symbols communicate important safety information through recognizable pictures, colors, and shapes. They warn laboratory personnel about toxic chemicals, infectious materials, radiation, electrical hazards, and other potential dangers. They also identify protective equipment, emergency exits, eyewash stations, and firefighting equipment.
However, not every laboratory sign communicates the same message. Some symbols identify specific chemical hazards under the Globally Harmonized System (GHS). Others follow international safety signage standards or identify specialized workplace risks.
Understanding these differences helps you recognize hazards before an accident happens. Whether you’re a student, teacher, researcher, or laboratory technician, knowing what each symbol means makes laboratory work safer and more organized.
This guide explains the most common laboratory safety symbols and their meanings, including chemical hazard pictograms, biological warnings, physical danger signs, PPE symbols, emergency signs, and fire safety indicators.
What Are Lab Safety Symbols?
Lab safety symbols are visual signs, pictograms, and labels that communicate potential dangers, mandatory precautions, prohibited activities, and emergency information in laboratory environments.
They help people recognize hazards without reading lengthy safety instructions. For example, a flame pictogram on a chemical container warns that its contents can catch fire. A biohazard symbol indicates potentially infectious biological materials.
These signs appear throughout different scientific facilities, including:
- Chemistry laboratories
- Biology laboratories
- Microbiology laboratories
- Medical and clinical laboratories
- Pharmaceutical research facilities
- Industrial testing laboratories
- University research departments
- Chemical storage rooms
- Radiation research facilities
Laboratory personnel use these symbols to recognize chemical hazards, biological hazards, physical hazards, and other workplace risks.
Why Are Laboratory Safety Symbols Important?
Laboratory work often involves hazards that aren’t immediately visible. A clear warning can prevent someone from touching a corrosive substance, entering a restricted area, or operating dangerous equipment without protection.
Laboratory safety signs serve several important purposes:
- Hazard identification: Help workers recognize dangerous substances, equipment, and work areas.
- Accident prevention: Warn people about conditions that could cause injuries or exposure.
- Personal protection: Indicate when gloves, goggles, respirators, or other PPE are required.
- Emergency response: Help people locate eyewash stations, emergency showers, first aid kits, and fire extinguishers.
- Safety communication: Provide consistent information to people who speak different languages.
- Regulatory compliance: Support workplace safety and applicable hazard communication requirements.
A symbol doesn’t replace training or a proper risk assessment. Instead, it gives people an immediate visual reminder of the precautions they must follow.
Different Types of Laboratory Safety Signs
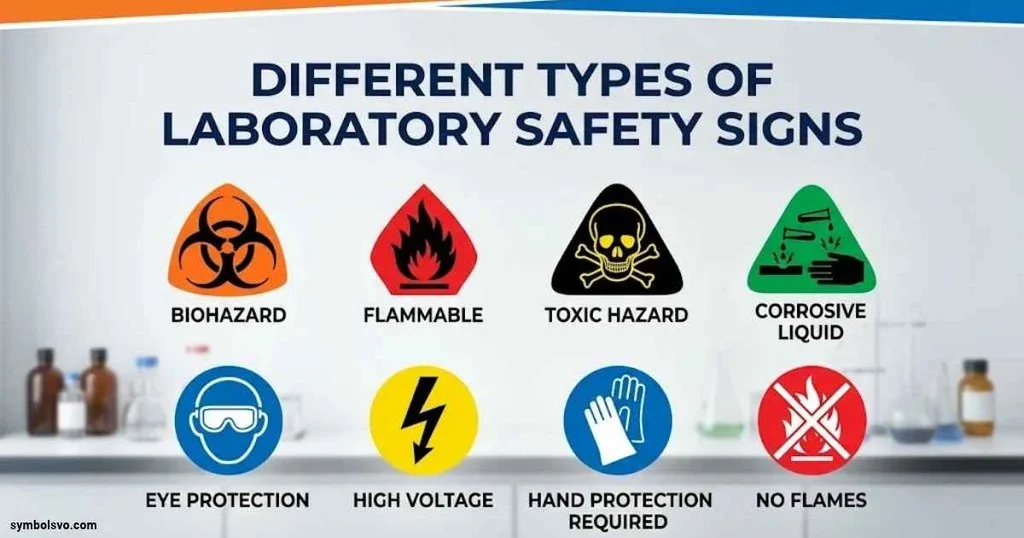
Laboratory safety signage generally falls into five main categories. Each category communicates a different type of instruction or warning.
Warning Signs
Warning signs alert people to potential dangers in a particular area. They commonly use a yellow background, black border, and black pictogram.
You’ll often find them near hazardous equipment, chemical storage areas, and restricted workspaces.
Common examples include:
- High voltage warning
- Radiation hazard warning
- Biological hazard warning
- Hot surface warning
- Low-temperature warning
- Laser radiation warning
- General danger warning
A warning sign tells you to recognize a hazard and take suitable precautions before proceeding.
Mandatory Signs
Mandatory signs indicate actions that laboratory personnel must follow. Standard workplace designs commonly use a blue circular background with a white pictogram.
Examples include:
- Safety goggles must be worn.
- Protective gloves must be worn.
- Lab coats must be worn.
- Hearing protection must be used.
- Respiratory protection is required.
- Safety footwear must be worn.
These signs help communicate personal protective equipment (PPE) requirements before someone enters a hazardous work area.
Prohibition Signs
Prohibition signs identify activities that people must not perform. They generally feature a circular design with a red border and diagonal red line.
Common examples include:
- No smoking
- No open flames
- No unauthorized entry
- No eating or drinking
- No access for unauthorized personnel
These signs help prevent activities that could increase the likelihood of an accident, contamination, or chemical exposure.
Safe Condition and Emergency Signs
Safe-condition signs identify emergency facilities and safe routes. They commonly feature a green background with white pictograms.
Examples include:
- Emergency exit
- First aid station
- Emergency eyewash station
- Emergency shower
- Emergency assembly point
- Emergency escape route
These signs become especially important during evacuations, chemical spills, and accidental exposure incidents.
Fire Safety Signs
Fire safety signs identify equipment used to control or respond to fires. Standard fire equipment signs generally use a red background with white symbols.
Common examples include:
- Fire extinguisher
- Fire hose
- Fire blanket
- Fire alarm
- Firefighting equipment
Remember that a red fire equipment sign serves a different purpose from the GHS flame pictogram. One identifies firefighting equipment. The other warns about flammable substances.
Common Lab Safety Symbols and Their Meanings
Laboratories display numerous hazard symbols because different materials and procedures create different risks. Learning to recognize the most common pictograms helps you understand what precautions to take.
The following chemical symbols primarily follow the GHS chemical hazard communication system.
Flammable Material Symbol
Fire hazard
The flammable material symbol features a black flame inside a white diamond with a red border. It identifies chemicals that can ignite under certain conditions.
Laboratories frequently use flammable substances in cleaning, extraction, sterilization, and chemical experiments.
Common examples include:
- Ethanol
- Methanol
- Acetone
- Isopropyl alcohol
- Certain petroleum-based solvents
These chemicals may produce vapors that ignite when they encounter sparks, flames, or other ignition sources.
Safety precautions:
- Keep flammable chemicals away from ignition sources.
- Store them in appropriate approved cabinets when required.
- Use suitable ventilation.
- Keep containers properly closed.
- Follow chemical-specific storage instructions.
Toxic or Poison Symbol
Acute toxicity
The skull and crossbones symbol warns that a substance can cause serious poisoning or death through certain exposure routes.
Toxic chemicals can enter the body through inhalation, ingestion, or skin exposure. The severity depends on the substance, concentration, and amount absorbed.
Examples of chemicals that may carry acute toxicity classifications include certain cyanide compounds and highly toxic laboratory reagents.
Safety precautions:
- Never taste or directly smell laboratory chemicals.
- Use appropriate gloves and protective clothing.
- Follow ventilation and containment requirements.
- Avoid direct skin contact.
- Read the chemical’s Safety Data Sheet before handling it.
The skull and crossbones specifically identify certain categories of acute toxicity. It doesn’t represent every substance that can cause long-term health problems.
Corrosive Material Symbol
Burn and eye damage hazard
The corrosive material symbol shows liquid dripping from test tubes onto a hand and a metal surface.
It warns that certain substances can cause severe skin burns, serious eye damage, or corrosion of metals.
Common examples include:
- Concentrated hydrochloric acid
- Sulfuric acid
- Nitric acid
- Sodium hydroxide
- Potassium hydroxide
Both strong acids and strong bases can cause severe injuries. Even a small splash can damage exposed skin or eyes.
Safety precautions:
- Wear compatible chemical-resistant gloves.
- Use suitable safety goggles.
- Handle corrosive substances in designated work areas.
- Use appropriate secondary containment.
- Follow the correct chemical dilution procedures.
If a corrosive chemical contacts your skin or eyes, begin the appropriate emergency flushing procedure immediately and follow your laboratory’s exposure response instructions.
Explosive Material Symbol
Explosion hazard
The explosive material symbol features an exploding bomb. It warns about substances that can explode under certain conditions.
Explosive materials may react violently when exposed to heat, shock, friction, or other triggering conditions.
Certain unstable chemicals and classified explosive compounds carry this warning.
Safety precautions:
- Follow approved storage procedures.
- Avoid unnecessary physical disturbance.
- Keep incompatible materials separate.
- Follow temperature control requirements.
- Allow only trained personnel to handle these substances.
Some self-reactive substances and organic peroxides also fall under relevant GHS explosive hazard classifications.
Oxidizing Material Symbol
Oxidizing hazard
The oxidizing material symbol displays a flame above a circle. It identifies chemicals that can cause or intensify fires.
Oxidizing agents support combustion by supplying oxygen or another oxidizing component during chemical reactions.
Examples include:
- Potassium permanganate
- Concentrated hydrogen peroxide
- Certain nitrate compounds
- Some perchlorates
Oxidizers can make combustible materials burn more intensely. Some may also react dangerously with incompatible substances.
Safety precautions:
- Keep oxidizers away from combustible materials.
- Follow chemical compatibility guidance.
- Store them according to approved procedures.
- Avoid contamination with incompatible chemicals.
- Use appropriate protective equipment.
Gas Under Pressure Symbol
Pressure hazard
The gas under pressure symbol shows a gas cylinder inside a red diamond.
It identifies gases stored under pressure, including compressed, liquefied, and refrigerated liquefied gases.
Damaged cylinders can release gas rapidly and create dangerous conditions. Refrigerated liquefied gases can also cause severe cold burns.
Safety precautions:
- Secure gas cylinders in an upright position when required.
- Use compatible regulators and connections.
- Keep protective valve caps fitted during transport when applicable.
- Store cylinders in suitable ventilated locations.
- Keep them away from excessive heat.
Health Hazard Symbol
Serious health hazard
The health hazard symbol shows a human silhouette with a starburst shape on the chest.
This pictogram identifies certain serious or long-term health hazards. Unlike the skull and crossbones, it generally focuses on specific chronic health effects and other serious classifications.
It can indicate:
- Carcinogenicity
- Germ cell mutagenicity
- Reproductive toxicity
- Respiratory sensitization
- Specific target organ toxicity
- Aspiration toxicity
For example, a chemical classified as a carcinogen may carry this symbol because exposure can increase cancer risk.
Safety precautions:
- Review the chemical’s hazard classification.
- Follow exposure limits and control procedures.
- Use appropriate ventilation.
- Wear required protective equipment.
- Follow safe handling and disposal instructions.
There isn’t a separate universal GHS carcinogen pictogram. Carcinogenicity is one of the hazards represented by the health hazard symbol.
Irritant or Harmful Substance Symbol
Irritant or harmful
The exclamation mark symbol identifies certain harmful chemical effects, including skin irritation, eye irritation, and some categories of acute toxicity.
Some chemicals can cause irritation even when they don’t produce immediate severe injuries.
Possible effects include:
- Skin redness
- Eye irritation
- Respiratory irritation
- Skin sensitization
- Drowsiness or dizziness
Safety precautions:
- Avoid unnecessary exposure.
- Wear appropriate gloves and eye protection.
- Follow ventilation instructions.
- Wash exposed skin according to safety guidance.
- Consult the Safety Data Sheet.
Environmental Hazard Symbol
Environmental hazard
The environmental hazard symbol shows a dead tree and fish. It indicates substances that can harm aquatic organisms.
Certain laboratory chemicals can damage aquatic ecosystems when released into drains, rivers, or other water sources.
Examples include chemicals classified as hazardous to aquatic life.
Safety precautions:
- Never pour hazardous chemicals into drains unless specifically authorized.
- Collect chemical waste in suitable containers.
- Prevent accidental releases.
- Follow approved waste disposal procedures.
- Keep incompatible waste streams separate.
Important fact: GHS recognizes nine pictograms when the environmental pictogram is included. However, OSHA’s US Hazard Communication Standard requires eight pictograms for covered chemical labels because environmental hazards fall outside OSHA’s jurisdiction.
Biological Hazard Symbols in Laboratories
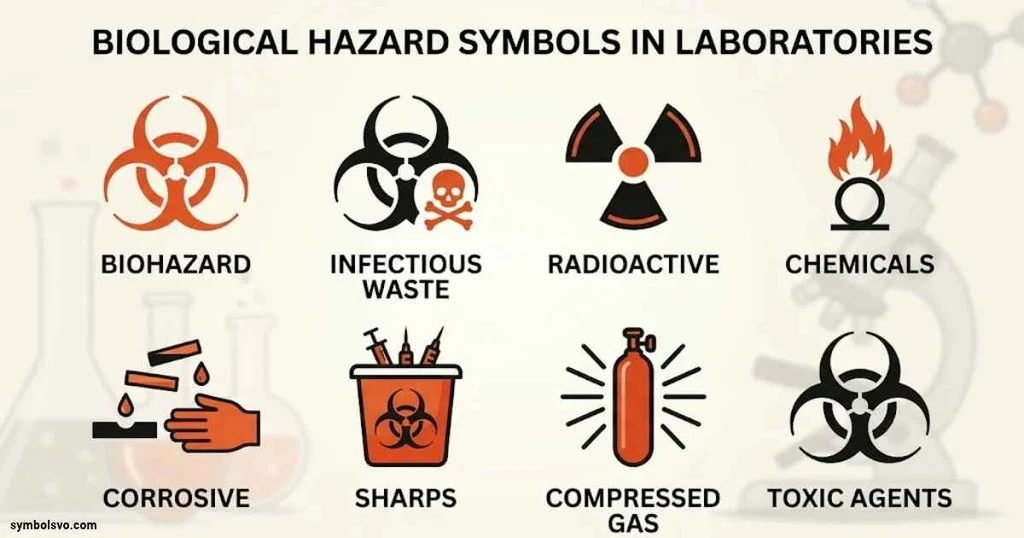
Biological laboratories handle materials that may contain infectious organisms, potentially harmful microorganisms, and contaminated specimens. The biohazard symbol helps identify areas and materials that require special biological safety precautions.
What Does the Biohazard Symbol Mean?
The biohazard symbol is a distinctive emblem formed from three interlocking curved shapes around a central point.
It warns people about biological materials that may cause infection or other biological harm.
You’ll commonly see it on:
- Infectious specimen containers
- Biological waste bins
- Microbiology laboratory doors
- Biosafety cabinets
- Blood collection and processing areas
- Contaminated laboratory equipment
- Certain biological storage containers
The symbol is particularly important when handling materials that may contain disease-causing organisms.
Examples include:
- Pathogenic bacteria
- Infectious viruses
- Human blood and potentially infectious body fluids
- Contaminated tissue specimens
- Biological cultures
- Certain biological toxins
Not every biological material presents the same risk. Laboratories must assess the organism, material, procedure, and possible exposure routes before selecting suitable protective measures.
Common Biological Hazards in Laboratories
Biological hazards can enter the body through different exposure routes. Understanding these pathways helps laboratory personnel choose appropriate precautions.
| Biological hazard | Potential concern |
| Pathogenic bacteria | Bacterial infections |
| Infectious viruses | Viral infections |
| Blood and body fluids | Exposure to bloodborne pathogens |
| Contaminated specimens | Accidental infection |
| Biological waste | Exposure to infectious materials |
| Aerosol-generating procedures | Inhalation exposure |
Aerosols deserve particular attention because small airborne particles can spread beyond the immediate work surface.
Procedures such as centrifugation, vigorous mixing, and certain sample-handling activities may generate aerosols.
Biosafety Levels 1, 2, 3, and 4 Explained
Laboratories use biosafety levels (BSL) to establish appropriate containment measures for biological work.
The four levels increase in containment requirements according to the risks associated with the biological agents and procedures.
| Biosafety level | General risk | Main safety approach |
| BSL-1 | Low risk | Standard microbiological practices |
| BSL-2 | Moderate risk | Restricted access and additional containment |
| BSL-3 | Serious infection risk, including respiratory transmission | Controlled access and specialized containment |
| BSL-4 | Highest biological containment level | Maximum containment and specialized protective systems |
BSL-1: These laboratories work with biological agents that aren’t known to consistently cause disease in healthy adults. Standard microbiological practices generally provide suitable protection.
BSL-2: These facilities handle agents associated with human disease. Personnel use additional precautions such as restricted access, appropriate PPE, and biological safety cabinets for procedures that create infectious aerosols or splashes.
BSL-3: These laboratories handle agents that can cause serious or potentially lethal disease, particularly through inhalation. They require controlled access, specialized containment equipment, and carefully designed ventilation systems.
BSL-4: This is the highest containment level. Facilities handle dangerous agents that may cause life-threatening disease and often have limited treatment options. They use specialized facilities and maximum-containment procedures.
The CDC identifies infectivity, disease severity, transmissibility, and the nature of laboratory work as important factors when determining appropriate containment.
Difference Between Biosafety Levels and Risk Groups
Biosafety levels and risk groups are related concepts, but they don’t mean the same thing.
Risk groups classify biological agents according to their risk to individuals and communities.
Biosafety levels describe the containment practices, equipment, and facility requirements needed for laboratory work.
| Classification | What it describes |
| Risk Group 1 | Agents with low individual and community risk |
| Risk Group 2 | Agents with moderate individual risk and limited community risk |
| Risk Group 3 | Agents with high individual risk and generally lower community risk |
| Risk Group 4 | Agents with high individual and community risk |
A common mistake is assuming that Risk Group 3 automatically means every laboratory must operate at BSL-3. The appropriate containment level depends on the agent, procedure, exposure routes, and institutional risk assessment.
Biosafety levels are not separate biohazard pictograms. They are laboratory containment classifications.
Chemical Hazard Symbols and Their Meanings
Chemical laboratories handle substances with different physical and health hazards. The GHS system helps identify these risks through standardized chemical hazard symbols.
Each pictogram communicates a specific hazard classification rather than simply indicating that a chemical is dangerous.
Flammable Chemicals
Flammable chemicals can ignite when they encounter a suitable ignition source.
Examples include ethanol, acetone, and methanol. Laboratories often use these substances during cleaning, extraction, and sample preparation.
Keep them away from sparks, hot surfaces, and open flames. Store them according to their chemical compatibility and fire safety requirements.
Toxic Chemicals
Toxic chemicals can cause poisoning through inhalation, ingestion, or skin exposure.
The skull and crossbones pictogram identifies certain acute toxicity classifications. However, not every harmful chemical carries this symbol.
Always check the concentration, exposure route, and chemical-specific instructions before handling toxic materials.
Corrosive Chemicals
Corrosive substances can destroy living tissue or damage metals.
Concentrated acids and strong bases are common examples. Even accidental splashes can cause serious injuries.
Use suitable gloves, eye protection, and appropriate handling equipment.
Carcinogenic and Chronic Health Hazards
Some chemicals create health risks after repeated or prolonged exposure. Others may cause serious effects even at relatively low exposure levels.
Relevant classifications include:
- Carcinogenicity
- Mutagenicity
- Reproductive toxicity
- Respiratory sensitization
- Specific target organ toxicity
The GHS health hazard pictogram identifies several of these risks.
Oxidizing Chemicals
Oxidizing substances can intensify combustion and increase fire severity.
For example, concentrated hydrogen peroxide and potassium permanganate can act as oxidizing agents under appropriate conditions.
Keep oxidizers away from incompatible combustible substances and follow approved storage instructions.
Explosive and Self-Reactive Chemicals
Some chemicals become unstable when exposed to heat, shock, friction, or contamination.
Explosive substances, certain self-reactive compounds, and organic peroxides require specific storage and handling controls.
Laboratory personnel should never assume that ordinary chemical storage procedures are suitable for these materials.
Gases Under Pressure
Compressed and liquefied gases can create mechanical, chemical, and temperature-related hazards.
A damaged cylinder may release its contents rapidly. Some refrigerated gases can cause severe cold burns or displace oxygen.
Always secure cylinders and use approved gas regulators and connections.
How to Read GHS Chemical Labels
Recognizing a pictogram is only the first step. A complete chemical label provides additional information about the substance and its risks.
A GHS label generally includes these elements:
| Label element | Purpose |
| Product identifier | Identifies the chemical |
| Supplier information | Identifies the responsible supplier |
| Pictogram | Shows the applicable hazard category |
| Signal word | Indicates relative hazard severity |
| Hazard statements | Describes the nature of the hazard |
| Precautionary statements | Explains recommended preventive and emergency measures |
The two main GHS signal words are:
- Danger: Used for more severe hazard categories.
- Warning: Used for less severe hazard categories within the applicable classification system.
For example, a chemical label might display the flame pictogram alongside the signal word Danger and a statement describing its flammability.
Always read the entire label rather than relying on the pictogram alone.
Physical Hazard Symbols in a Science Laboratory
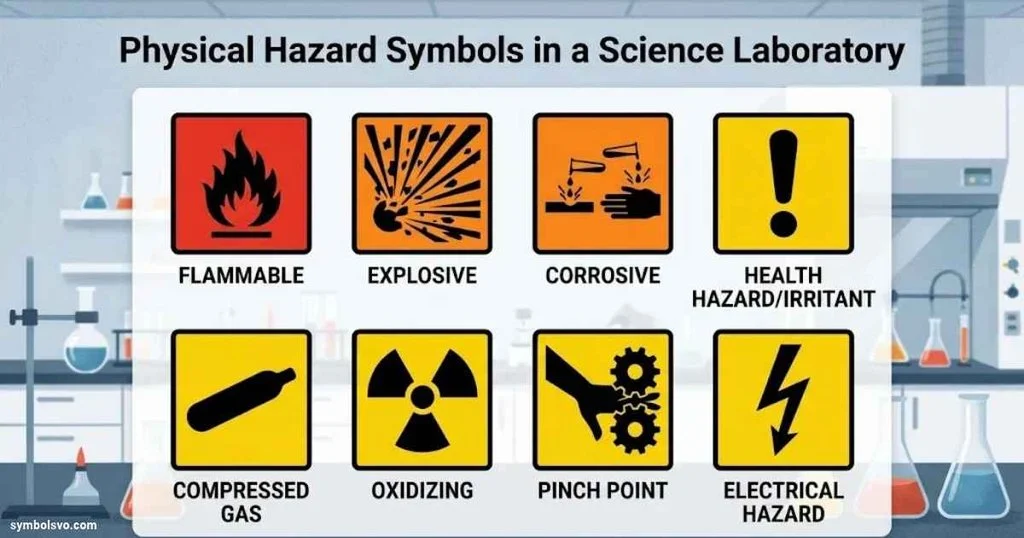
Not all laboratory hazards come from chemicals or biological materials. Equipment, electrical systems, radiation sources, extreme temperatures, and pressurized devices can also cause serious injuries.
Physical hazard symbols warn laboratory personnel about these dangers and help them identify areas that require additional precautions.
Radiation Hazard Symbol
The radiation hazard symbol features a three-bladed trefoil around a central point. It commonly appears in yellow and black.
This symbol warns about potential exposure to ionizing radiation.
Ionizing radiation has enough energy to remove electrons from atoms. Depending on the exposure, it can damage living tissue and increase the risk of long-term health effects.
Common sources include:
- X-ray equipment
- Radioactive isotopes
- Gamma radiation sources
- Certain nuclear research equipment
- Radiation-producing laboratory instruments
Safety precautions:
- Follow radiation access restrictions.
- Use appropriate shielding.
- Minimize exposure time.
- Maintain a safe distance where practical.
- Follow radiation monitoring requirements.
- Never handle radioactive materials without proper authorization.
Radiation-controlled areas may also display additional information about contamination risks, radioactive materials, and required protective measures.
Laser Hazard Symbol
The laser warning symbol identifies equipment that produces potentially hazardous laser radiation.
Laboratories use lasers in optical research, spectroscopy, medical research, imaging, and material testing.
Direct or reflected laser beams can damage the eyes. High-powered lasers may also burn skin or ignite combustible materials.
Safety precautions:
- Wear eyewear suitable for the laser’s wavelength and power.
- Never look directly into a laser beam.
- Follow beam enclosure and access controls.
- Avoid reflective objects near exposed beams.
- Follow equipment-specific operating procedures.
Different laser classifications have different safety requirements. Always check the equipment label and manufacturer’s instructions.
High Voltage and Electrical Hazard Symbol
The high voltage symbol usually features a black lightning bolt inside a yellow warning triangle.
It identifies equipment or areas where contact with electrical components could cause severe injury.
Common locations include:
- Electrical testing benches
- High-voltage power supplies
- Laboratory control panels
- Specialized research equipment
- Electrical distribution systems
Electrical hazards can cause electric shock, burns, fires, and potentially fatal injuries.
Safety precautions:
- Never touch exposed electrical conductors.
- Keep liquids away from electrical equipment.
- Inspect cables and connections.
- Use approved electrical equipment.
- Follow lockout and isolation procedures when required.
- Allow qualified personnel to repair electrical systems.
Hot Surface Symbol
The hot surface warning sign indicates equipment or surfaces that may reach temperatures capable of causing burns.
You’ll commonly find it near:
- Laboratory ovens
- Heating plates
- Furnaces
- Autoclaves
- Heated instruments
- Thermal processing equipment
A surface may remain hot even after someone switches off the equipment.
Safety precautions:
- Allow equipment to cool before handling.
- Use appropriate heat-resistant gloves.
- Avoid touching marked surfaces.
- Follow equipment-specific temperature warnings.
Cryogenic and Low-Temperature Hazard Symbol
Cryogenic warnings identify extremely cold substances, equipment, or surfaces.
Laboratories use cryogenic materials for sample preservation, scientific experiments, and temperature-controlled processes.
Liquid nitrogen is one of the most common examples.
Cryogenic materials can cause severe cold burns and frostbite. Some also expand rapidly when they evaporate, creating dangerous pressure buildup or oxygen displacement in poorly ventilated spaces.
Safety precautions:
- Wear suitable cryogenic gloves.
- Use appropriate face and eye protection.
- Work in adequately ventilated areas.
- Use approved cryogenic containers.
- Never seal cryogenic liquids inside ordinary airtight containers.
Ordinary protective gloves aren’t necessarily suitable for cryogenic work. Always select equipment designed for the specific temperature and exposure risk.
Magnetic Field Warning Symbol
Magnetic field warning signs identify areas with strong magnetic fields.
These signs commonly appear around specialized scientific instruments and magnetic resonance imaging facilities.
Strong magnetic fields can attract ferromagnetic objects with considerable force. They may also interfere with certain medical devices and sensitive equipment.
Safety precautions:
- Follow restricted access instructions.
- Keep unauthorized metal objects outside controlled areas.
- Observe medical implant screening requirements.
- Follow equipment-specific magnetic field safety procedures.
Compressed Gas and Pressure Hazard Warnings
Pressurized systems can create serious mechanical hazards if their components fail.
Laboratories use compressed gases in chromatography, spectroscopy, welding, research experiments, and other scientific processes.
Potential dangers include:
- Sudden gas release
- Cylinder movement
- Damaged regulators
- Pressure-related equipment failure
- Oxygen displacement
- Cold burns from certain gas releases
Use approved pressure regulators and secure cylinders correctly. Never attempt to repair damaged pressurized equipment without proper authorization.
Broken Glass and Sharps Warning Signs
Broken glass and sharp instruments create puncture and cutting hazards.
These warnings commonly appear near:
- Glass disposal containers
- Sharps waste bins
- Laboratory cutting equipment
- Contaminated needle disposal areas
- Specimen preparation workstations
Never place broken glass or contaminated sharps in ordinary waste containers when designated disposal systems are required.
Use suitable tools to collect broken glass and follow your laboratory’s disposal procedures.
Personal Protective Equipment (PPE) Symbols
Personal Protective Equipment (PPE) helps reduce exposure to chemical, biological, and physical hazards.
Laboratories use mandatory signs to tell personnel which protective equipment they must wear before entering specific work areas.
Safety Goggles Required
The safety goggles symbol indicates that eye protection must be worn in a designated area.
Goggles protect the eyes against chemical splashes, flying particles, and other workplace hazards.
They are particularly important when handling corrosive chemicals, preparing solutions, and working with materials that may splash.
Choose eye protection that provides the level of protection required by the task.
Protective Gloves Required
This sign indicates that laboratory personnel must wear suitable protective gloves.
However, not all gloves protect against the same substances.
Common glove materials include:
- Nitrile
- Neoprene
- Butyl rubber
- Latex
- Specialized chemical-resistant materials
For example, a glove suitable for ordinary biological specimen handling may not provide adequate protection against every organic solvent.
Always check chemical compatibility before selecting gloves.
Lab Coat Required
The lab coat symbol indicates that protective clothing must be worn.
Laboratory coats help reduce skin and clothing exposure to spills, splashes, and contaminated materials.
A suitable laboratory coat should match the hazards of the work being performed.
Some procedures require specialized gowns or additional protective clothing.
Face Shield Required
A face shield protects the face against splashes, flying particles, and certain physical hazards.
Laboratories may require face shields when handling corrosive substances or performing procedures with significant splash risks.
A face shield generally doesn’t replace safety goggles. Use suitable underlying eye protection whenever the task requires it.
Respiratory Protection Required
This sign indicates that workers must use designated respiratory protective equipment.
Respirators help protect against specific airborne hazards when properly selected and used.
Examples include:
- Certain hazardous dusts
- Chemical vapors
- Harmful aerosols
- Infectious airborne particles
Different respirators protect against different hazards. A simple dust mask doesn’t automatically provide protection against chemical vapors or every biological aerosol.
In workplaces subject to respiratory protection requirements, proper selection, medical evaluation, fit testing, and training may be necessary.
Safety Footwear Required
The safety footwear symbol indicates that suitable protective shoes must be worn.
Laboratory footwear requirements depend on the environment and its hazards.
Closed-toe shoes help protect against spills, broken glass, and falling objects. Some workplaces also require specialized chemical-resistant or protective footwear.
Hearing Protection Required
Hearing protection signs identify areas where workers must use suitable hearing protection.
Certain laboratory equipment produces potentially harmful noise levels.
Examples include:
- Industrial centrifuges
- High-powered mechanical equipment
- Specialized testing machinery
- Certain ultrasonic and processing equipment
Depending on the noise exposure, personnel may need earplugs or earmuffs.
Laboratory Emergency Signs and Safety Station Symbols
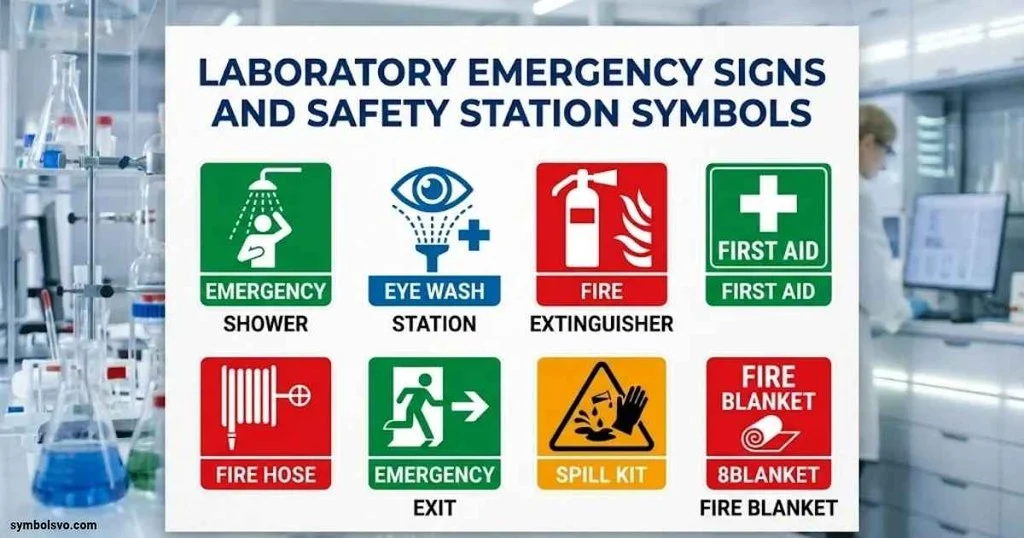
Emergency signs help people locate important facilities when an accident occurs.
During a chemical spill or accidental exposure, knowing where emergency equipment is located can save valuable time.
Emergency Eyewash Station Symbol
The eyewash station symbol identifies equipment used to flush the eyes after chemical splashes or other hazardous exposure.
Chemical splashes can cause serious eye injuries. Immediate access to appropriate flushing facilities is therefore essential in laboratories where such exposure is possible.
An eyewash station generally includes:
- Two eyewash nozzles
- A water supply
- A control mechanism
- A suitable drainage arrangement
Personnel should know its location before starting laboratory work.
When a chemical enters the eyes, begin flushing immediately and follow the chemical-specific emergency instructions. Don’t delay flushing while searching for a Safety Data Sheet.
Emergency Safety Shower Symbol
The emergency shower symbol identifies facilities used to rinse hazardous substances from the body.
These showers are especially important in laboratories that handle corrosive chemicals or other substances capable of causing serious skin exposure.
An emergency shower may be required after a substantial chemical spill on clothing or exposed skin.
Remember: Remove contaminated clothing when safe and appropriate while using the shower. Follow the laboratory’s emergency decontamination procedure and obtain medical assessment as necessary.
First Aid Symbol
The first aid symbol commonly features a white cross on a green background.
It identifies first aid facilities or equipment used to provide initial assistance after an injury.
A laboratory first aid kit may contain:
- Sterile dressings
- Bandages
- Adhesive strips
- Disposable gloves
- Other approved first aid supplies
The exact contents depend on workplace requirements and the hazards present.
First aid supplies don’t replace professional medical treatment for serious injuries or chemical exposure.
Emergency Exit Symbol
The emergency exit sign identifies a designated evacuation route or exit.
It helps laboratory occupants leave a building during fires, chemical releases, and other emergencies.
Some signs include directional arrows that guide people toward the nearest suitable exit.
Keep evacuation routes clear. Never block emergency doors or place equipment in designated escape pathways.
Emergency Assembly Point Symbol
The assembly point symbol identifies a designated gathering location outside a building.
After evacuation, laboratory personnel should report to the assigned location.
This allows supervisors and emergency responders to check whether everyone has left the hazardous area.
Personnel should never reenter an evacuated laboratory without authorization.
Hand Washing Station Symbol
Handwashing signs identify facilities where laboratory personnel can clean their hands.
Proper hand hygiene helps reduce the spread of biological contaminants and chemical residues.
Wash your hands:
- After handling biological materials.
- After removing protective gloves.
- Before leaving the laboratory.
- After accidental contamination.
- Before eating or drinking outside laboratory work areas.
Hand sanitizer may support hygiene in suitable situations. However, it doesn’t replace handwashing when visible contamination or certain hazardous materials are present.
Emergency Telephone or Alarm Symbol
Emergency communication signs identify telephones, alarm buttons, or other equipment used to report dangerous incidents.
These facilities may help personnel contact emergency services, laboratory supervisors, security teams, or designated safety officers.
Learn the location of emergency communication equipment before beginning work.
Fire Safety Symbols and Laboratory Fire Equipment
Fire hazards are particularly important in laboratories that handle solvents, gases, combustible materials, and heating equipment.
Fire safety symbols help people locate firefighting equipment and understand where emergency response resources are available.
Fire Extinguisher Symbol
The fire extinguisher symbol identifies the location of a portable fire extinguisher.
Laboratories may use different extinguisher types depending on the materials and equipment present.
Common categories include:
| Extinguisher type | Typical application |
| Water | Suitable Class A fires involving ordinary combustible materials |
| Foam | Certain Class A and B fires |
| Carbon dioxide (CO₂) | Certain flammable liquid and energized electrical equipment fires |
| Dry chemical | Depends on the agent and fire classification |
| Wet chemical | Certain cooking oil and fat fires |
Not every extinguisher is suitable for every laboratory fire.
For example, applying water to certain chemical or electrical fires can make the situation worse.
Only trained personnel should attempt to fight a fire when it is safe to do so. Otherwise, activate the alarm, evacuate, and contact emergency responders.
Fire Blanket Symbol
The fire blanket sign identifies equipment designed to smother certain small fires.
Fire blankets may also be used in specific emergency situations involving clothing fires when the workplace procedure permits.
However, a fire blanket isn’t a universal solution for chemical fires or large laboratory fires.
Follow your facility’s fire response training.
Fire Hose Symbol
This sign identifies the location of firefighting hoses.
Fire hoses may provide a water supply for firefighting, but water isn’t appropriate for every fire.
Never assume that a fire hose is safe to use on burning solvents, reactive chemicals, or energized electrical equipment.
Fire Alarm Symbol
The fire alarm symbol identifies an alarm activation point or emergency fire signaling equipment.
When a fire or suspected fire occurs:
- Activate the alarm according to local procedures.
- Alert people nearby.
- Leave through a designated emergency route.
- Report to the assembly point.
- Contact emergency services when required.
No Smoking and No Open Flame Signs
These prohibition signs are especially important around flammable liquids, combustible gases, and other ignition-sensitive materials.
A no-smoking sign prohibits smoking in a designated area. A no-open-flame sign restricts flames and other prohibited ignition sources.
Both help reduce the likelihood of accidental fires.
Laboratory Prohibition Signs and Their Meanings
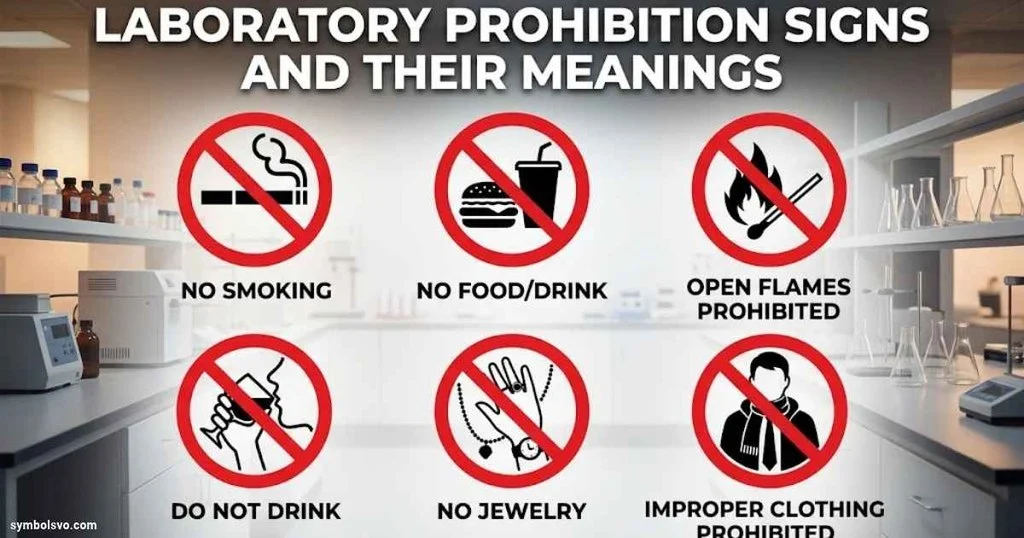
Prohibition signs communicate actions that laboratory personnel must avoid.
They generally use a red circular border and diagonal line across a black pictogram.
No Eating or Drinking
This sign prohibits eating and drinking in designated laboratory areas.
Food and beverages can become contaminated through contact with chemicals, biological materials, or contaminated surfaces.
People may accidentally ingest hazardous substances if they bring food into laboratory workspaces.
Keep food and drinks in designated areas outside the laboratory.
No Smoking
This sign prohibits smoking in designated locations.
Smoking can introduce ignition sources near flammable substances. It can also expose people to additional workplace hazards.
Follow all designated smoking restrictions.
No Open Flames
The no-open-flame sign prohibits exposed flames in specified areas.
This restriction is important where laboratories store or use flammable liquids and gases.
Even a small flame can ignite flammable vapors under suitable conditions.
Authorized Personnel Only
This sign restricts access to designated laboratory areas.
It commonly appears near:
- Biosafety laboratories
- Radiation-controlled areas
- Chemical storage rooms
- Specialized research facilities
- Restricted equipment rooms
Only personnel with the required authorization, training, and protective equipment should enter these locations.
No Unauthorized Entry
This sign prevents people from entering restricted or potentially hazardous spaces without permission.
It may appear near maintenance areas, experimental facilities, and controlled laboratory workspaces.
No Mobile Phones or Electronic Devices
Some laboratory environments restrict electronic devices because of specific equipment, contamination, or safety concerns.
For example, a controlled environment may prohibit personal electronic devices to reduce contamination.
However, there isn’t a universal rule banning mobile phones from every laboratory. Follow the restrictions posted for the specific area.
Laboratory Safety Symbols by Laboratory Type
Different laboratories display different safety signs because their work involves different hazards.
A chemistry laboratory doesn’t have exactly the same safety requirements as a microbiology laboratory. Understanding these differences helps explain why certain symbols appear in particular scientific environments.
Chemistry Laboratory Symbols
Chemistry laboratories commonly display chemical hazard pictograms and equipment warnings.
Frequently encountered symbols include:
- Flammable material
- Toxic substances
- Corrosive chemicals
- Oxidizing materials
- Explosive substances
- Gas under pressure
- Health hazard
- Mandatory PPE
Chemical laboratories also use signs identifying fume hoods, emergency showers, eyewash stations, and chemical storage areas.
Biology Laboratory Symbols
Biology laboratories frequently handle biological specimens, cultures, and other materials that may require contamination controls.
Common signs include:
- Biohazard
- Biological waste
- Gloves required
- Lab coat required
- Handwashing station
- Restricted access
- Emergency eyewash
The exact precautions depend on the organisms and procedures involved.
Microbiology Laboratory Symbols
Microbiology laboratories work with microorganisms, cultures, and potentially infectious materials.
The biohazard symbol is especially important in these environments.
Other common safety indicators include:
- Biosafety cabinet identification
- Infectious material warnings
- Sharps disposal signs
- Biological waste labels
- Restricted entry notices
- PPE requirements
Aerosol-generating procedures may require additional containment measures.
Medical and Clinical Laboratory Symbols
Medical and clinical laboratories process blood, tissue samples, body fluids, and other diagnostic specimens.
Their safety signage may include:
- Biohazard
- Bloodborne pathogen warnings
- Chemical hazard pictograms
- Sharps disposal
- Protective gloves
- Face protection
- Handwashing facilities
These signs help prevent accidental exposure and reduce contamination risks.
Research and Industrial Laboratory Symbols
Research and industrial laboratories may use advanced instruments and specialized equipment.
Their signs often address:
- Electrical hazards
- Laser radiation
- Ionizing radiation
- High temperatures
- Cryogenic materials
- Magnetic fields
- Compressed gases
- Mechanical hazards
The required signs depend on the equipment, procedures, and results of the workplace risk assessment.
Laboratory Safety Sign Colors and Shapes
The color and shape of a safety sign provide useful information before you even recognize its pictogram.
Most standardized workplace safety signs use specific visual conventions to distinguish warnings, mandatory actions, prohibited activities, and emergency facilities.
What Does a Yellow Laboratory Safety Sign Mean?
Yellow signs generally indicate a warning about a potential hazard.
They commonly use a triangular shape with a black border and black pictogram.
Examples include:
- Electrical hazard
- Radiation warning
- Low temperature
- Hot surface
- General danger
- Biological hazard warnings in applicable sign systems
When you see a yellow warning sign, identify the danger before entering or operating the equipment.
What Does a Red Laboratory Safety Sign Mean?
Red appears in several types of laboratory safety signage.
Its meaning depends on the sign’s design.
- A red circular border with a diagonal line generally indicates prohibition.
- A red rectangular sign commonly identifies firefighting equipment.
- A red diamond identifies GHS chemical hazard pictograms.
For example, a no-smoking sign prohibits an activity, while a red fire extinguisher sign identifies equipment.
What Does a Blue Laboratory Safety Sign Mean?
Blue circular signs generally indicate mandatory safety actions.
Examples include:
- Wear safety goggles.
- Wear protective gloves.
- Wear safety footwear.
- Wear respiratory protection.
- Use hearing protection.
These signs tell personnel which protective measures they must follow.
What Does a Green Laboratory Safety Sign Mean?
Green signs generally identify safe conditions and emergency facilities.
Examples include:
- Emergency exits
- First aid facilities
- Eyewash stations
- Emergency showers
- Assembly points
They help people locate essential safety resources quickly.
Laboratory Safety Sign Colors and Shapes Comparison
| Sign category | Typical appearance | Main purpose |
| Warning | Yellow triangle | Identifies potential dangers |
| Prohibition | Red-bordered circle | Prohibits specific activities |
| Mandatory | Blue circle | Requires a safety action |
| Safe condition | Green rectangle or square | Identifies safe routes and emergency facilities |
| Fire equipment | Red rectangle or square | Identifies firefighting equipment |
| GHS chemical pictogram | Red diamond | Identifies chemical hazards |
These conventions follow recognized safety signage systems, although exact requirements depend on the applicable standard and jurisdiction.
Difference Between GHS, ISO 7010, and NFPA 704 Laboratory Safety Symbols
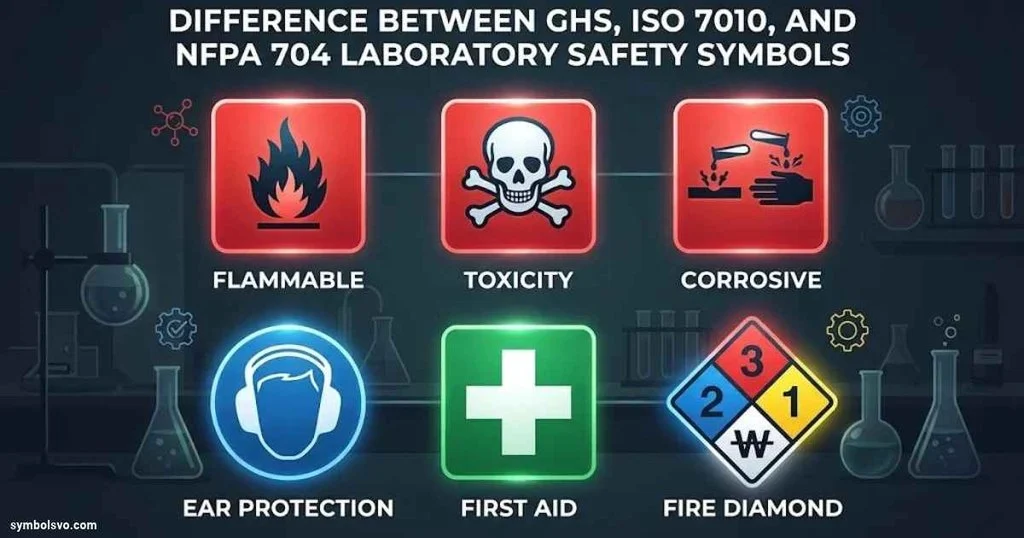
Not all laboratory hazard symbols belong to the same system.
Three important systems are GHS, ISO 7010, and NFPA 704. Each serves a different purpose and communicates safety information in a different format.
Understanding these differences prevents confusion when reading chemical labels and workplace signs.
What Is the GHS Chemical Hazard Pictogram System?
The Globally Harmonized System of Classification and Labelling of Chemicals (GHS) provides an internationally recognized framework for classifying chemical hazards and communicating them through labels and Safety Data Sheets.
Its chemical hazard pictograms generally feature:
- A white background
- A black hazard symbol
- A red diamond-shaped border
GHS covers several categories of hazards, including physical hazards, health hazards, and environmental hazards.
Its nine pictograms include:
- Flame
- Skull and crossbones
- Corrosion
- Exploding bomb
- Flame over circle
- Gas cylinder
- Health hazard
- Exclamation mark
- Environment
Countries implement GHS through their own regulations. Therefore, legal labeling requirements can differ between jurisdictions.
For example, OSHA’s Hazard Communication Standard in the United States requires eight pictograms for covered chemical labels. The environmental pictogram isn’t part of OSHA’s required set.
Occupational Safety and Health Administration+1
What Is ISO 7010?
ISO 7010 is an international standard for registered graphical safety signs.
It establishes standardized designs for communicating safety information in different environments.
Its applications include:
- Accident prevention
- Fire protection
- Health hazard information
- Emergency evacuation
- Mandatory safety instructions
- Prohibited activities
ISO 7010 uses recognizable shapes, colors, and pictograms to communicate information consistently.
For example, a blue circular sign requiring eye protection communicates a mandatory action. A green emergency exit sign identifies an escape route.
The standard is designed to help people recognize safety instructions across different workplaces and countries.
What Is the NFPA 704 Hazard Diamond?
The NFPA 704 hazard diamond is a system used to communicate important material hazards, particularly for emergency responders.
Unlike GHS pictograms, it uses four colored sections arranged in a diamond.
Each color represents a different type of hazard.
| Color | Hazard category | Information |
| Blue | Health | Potential health effects |
| Red | Flammability | Fire-related hazard |
| Yellow | Instability | Chemical instability or reactivity |
| White | Special hazards | Specific additional hazard information |
The blue, red, and yellow sections use numerical ratings from 0 to 4.
| Rating | General interpretation |
| 0 | Minimal hazard |
| 1 | Slight hazard |
| 2 | Moderate hazard |
| 3 | Serious hazard |
| 4 | Severe hazard |
The white section uses special symbols or abbreviations rather than the same numerical scale. Depending on the applicable marking, these may communicate water reactivity or other special hazards.
NFPA 704 is intended to help emergency responders understand the hazards associated with materials at fixed facilities. It doesn’t replace chemical labels or Safety Data Sheets.
Difference Between GHS Pictograms and NFPA 704
| Feature | GHS | NFPA 704 |
| Main purpose | Chemical hazard communication | Emergency hazard identification |
| Design | Red diamond | Four-color diamond |
| Main audience | Chemical users and workers | Emergency responders |
| Hazard information | Specific chemical hazard classes | Health, flammability, instability, and special hazards |
| Common location | Chemical containers and workplace labels | Facilities and chemical storage areas |
For example, a chemical container may display GHS pictograms identifying flammability and health hazards. The facility may also display an NFPA 704 diamond to communicate emergency hazard ratings.
These systems complement each other rather than replacing one another.
How to Read and Interpret Laboratory Safety Labels
A laboratory safety symbol gives you an immediate warning, but the complete label provides much more useful information.
Before handling an unfamiliar chemical, examine its label and consult its Safety Data Sheet.
Identify the Symbol and Hazard Category
Start by recognizing the pictogram.
Determine whether it represents:
- Flammability
- Acute toxicity
- Corrosiveness
- Oxidizing properties
- Explosive hazards
- Serious health effects
- Irritation
- Environmental toxicity
- Pressurized gas
Some chemicals carry more than one pictogram because they have several hazard classifications.
Read the Signal Word
Look for the signal word Danger or Warning.
These words communicate the relative severity of the classified hazard under GHS rules.
- Danger: Identifies more severe hazard categories.
- Warning: Identifies less severe categories where that signal word applies.
A chemical label may display several pictograms but only one applicable signal word. When multiple classifications apply, the GHS rules determine which signal word takes priority.
Check the Hazard Statements
Hazard statements describe the nature of the chemical’s danger.
For example, a label may warn that a substance:
- Causes severe skin burns and eye damage.
- Is highly flammable.
- May cause cancer.
- Is toxic if swallowed.
- May cause respiratory irritation.
These statements explain the actual risks rather than simply naming the hazard category.
Follow Precautionary Statements
Precautionary statements explain how to reduce exposure and respond to incidents.
They generally cover four areas:
| Category | What it explains |
| Prevention | How to avoid exposure |
| Response | What to do after an accident |
| Storage | How to store the substance safely |
| Disposal | How to dispose of the material |
For example, a precautionary statement may instruct users to wear protective gloves, keep a container away from heat, or seek medical attention after exposure.
Consult the Safety Data Sheet (SDS)
A Safety Data Sheet (SDS) provides detailed information about a chemical’s hazards and safe handling requirements.
It contains 16 standardized sections.
Some particularly useful sections for laboratory personnel include:
| SDS section | Information provided |
| Section 1 | Identification |
| Section 2 | Hazard identification |
| Section 3 | Composition and ingredient information |
| Section 4 | First-aid measures |
| Section 5 | Firefighting measures |
| Section 6 | Accidental release measures |
| Section 7 | Handling and storage |
| Section 8 | Exposure controls and personal protection |
| Section 9 | Physical and chemical properties |
| Section 10 | Stability and reactivity |
| Section 11 | Toxicological information |
| Section 12 | Ecological information |
| Section 13 | Disposal considerations |
| Section 14 | Transport information |
| Section 15 | Regulatory information |
| Section 16 | Other information |
For example, if you encounter a corrosive chemical, Section 2 identifies its hazards. Section 4 explains first aid. Section 8 provides relevant exposure controls and PPE guidance.
Reading the SDS before handling an unfamiliar substance helps you prepare for potential incidents.
Why Are Laboratory Safety Symbols Important?
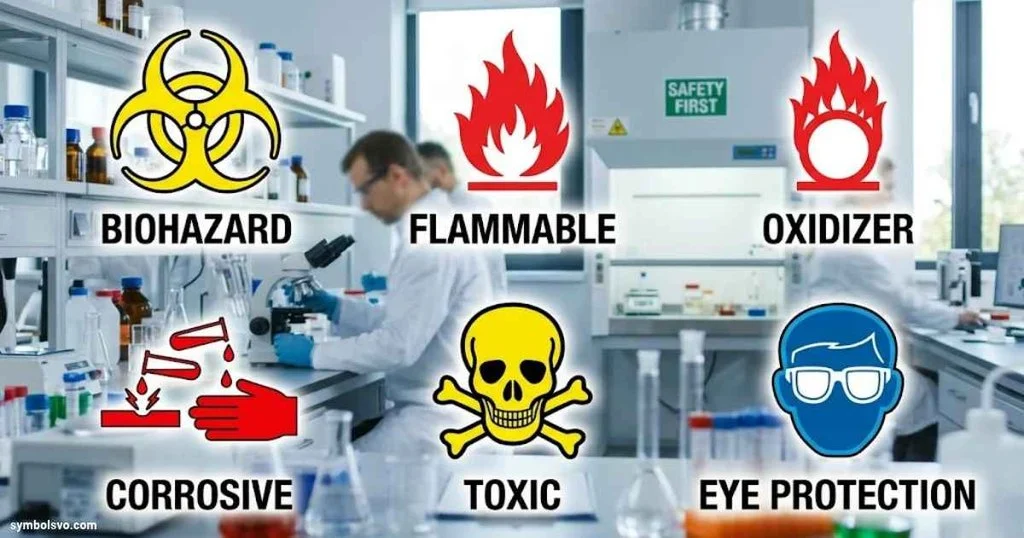
Laboratory safety symbols do more than decorate walls and chemical containers. They support daily safety decisions and help prevent avoidable incidents.
Early Hazard Identification
Some laboratory hazards aren’t immediately visible.
A chemical may produce harmful vapors without an obvious smell. An electrical system may contain dangerous voltage even when it appears inactive.
Warning signs help identify these risks before someone interacts with the material or equipment.
Accident and Injury Prevention
Clear safety signs remind people to follow precautions before performing potentially dangerous activities.
For example, a mandatory eye protection sign helps prevent injuries caused by chemical splashes and flying particles.
Similarly, a no-open-flame sign helps reduce ignition risks near flammable chemicals.
Protection of Laboratory Personnel
Safety signage reminds workers and students to use appropriate protective equipment.
Gloves, goggles, protective clothing, and respirators can reduce exposure when correctly selected and used.
However, PPE should complement other protective measures rather than replace them.
Emergency Preparedness
Emergency signs help people find essential facilities when something goes wrong.
During an accident, personnel may need to locate an eyewash station, emergency shower, fire extinguisher, or evacuation route.
Recognizable signs make these facilities easier to identify.
Chemical and Biological Risk Management
Proper labeling helps laboratories control dangerous substances and potentially infectious materials.
For example, biohazard signs help identify biological waste. Chemical pictograms help personnel distinguish flammable, corrosive, and toxic substances.
This supports safer storage, handling, transport, and disposal practices.
Regulatory Compliance
Applicable safety regulations require certain workplaces to communicate hazards through labels, warnings, and other safety information.
In the United States, OSHA’s Hazard Communication Standard establishes requirements for covered chemical hazard communication.
Other countries use their own workplace safety laws and adopted standards.
Proper laboratory signage helps organizations meet applicable requirements while improving workplace awareness.
How to Use Laboratory Safety Signs Effectively
Displaying a safety symbol isn’t enough. Laboratories must ensure that signs accurately reflect the hazards present and communicate instructions clearly.
Place Signs Near Relevant Hazards
Position signs where people can see them before entering a dangerous area or handling hazardous equipment.
For example:
- Display biohazard warnings at relevant biological work areas.
- Place radiation signs at controlled access points.
- Identify eyewash stations with recognizable emergency signage.
- Display chemical hazard labels on applicable containers.
A warning hidden behind equipment provides little practical protection.
Keep Safety Symbols Visible and Readable
Signs should remain easy to recognize under normal working conditions.
Laboratories should:
- Remove objects blocking signs.
- Maintain adequate lighting.
- Replace damaged or faded signage.
- Use suitable materials for the environment.
- Keep emergency equipment identification visible.
Match Signs to Actual Hazards
Don’t use safety signs simply because they appear in a standard laboratory checklist.
First, identify the actual hazards through a laboratory risk assessment.
Then select appropriate signs based on:
- Chemicals being handled
- Biological materials present
- Equipment being operated
- Exposure routes
- Required PPE
- Emergency facilities
- Access restrictions
This prevents unnecessary warnings that may confuse laboratory personnel.
Train Laboratory Personnel
Every person entering a laboratory should understand the important signs displayed there.
Training should explain:
- Common hazard pictograms
- Chemical label interpretation
- PPE requirements
- Biological safety procedures
- Emergency equipment locations
- Evacuation procedures
- Chemical spill response
Students and new employees should receive appropriate safety instructions before starting laboratory activities.
Update Laboratory Safety Signage
Laboratory conditions can change when facilities introduce new chemicals, equipment, or experimental procedures.
Review safety signage whenever relevant changes occur.
Remove outdated warnings and replace them with signs that accurately represent the current hazards.
Regular inspections also help identify damaged labels, missing warnings, and obstructed emergency signs.
Common Mistakes When Interpreting Lab Safety Symbols
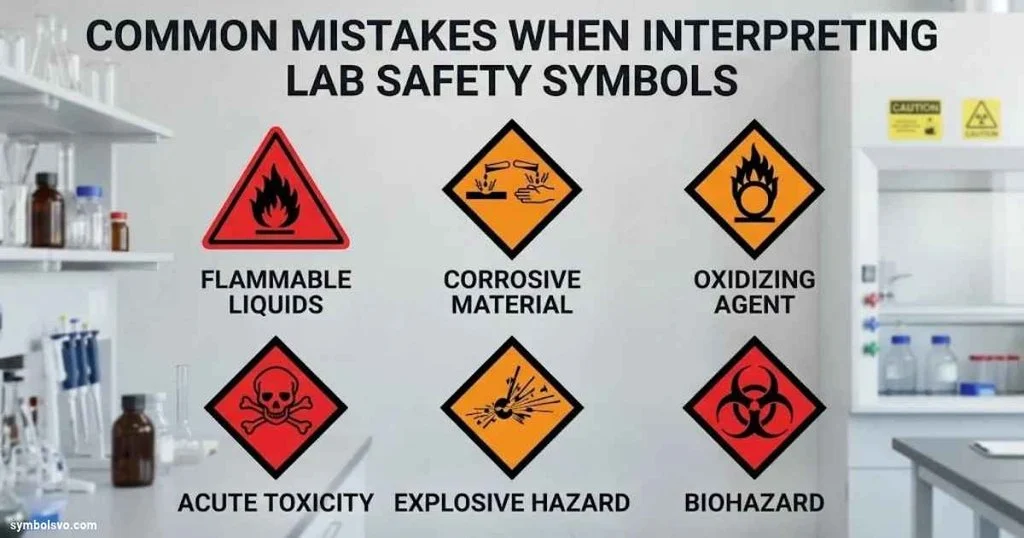
Even experienced laboratory personnel can misunderstand safety signs when they confuse different hazard classification systems or overlook important label information.
Here are common mistakes worth avoiding.
Confusing Flammable and Oxidizing Symbols
The flame pictogram identifies flammable substances. The flame-over-circle pictogram identifies oxidizing substances.
These symbols communicate different hazards.
A flammable chemical can ignite. An oxidizer can intensify combustion by supporting a reaction with combustible materials.
Assuming Every Toxic Chemical Has a Skull Symbol
The skull and crossbones identifies certain acute toxicity classifications.
However, chemicals that cause cancer, reproductive harm, or respiratory sensitization generally use the health hazard pictogram instead.
Always read the complete label.
Treating Biosafety Levels as Biohazard Symbols
BSL-1, BSL-2, BSL-3, and BSL-4 describe laboratory containment levels.
They aren’t four different versions of the biohazard symbol.
The biohazard symbol identifies potentially infectious biological materials. Biosafety levels describe the controls needed for particular laboratory activities.
Assuming a Face Shield Replaces Safety Goggles
A face shield protects much of the face, but it may not provide sufficient eye protection by itself.
Certain procedures require safety goggles underneath a face shield.
Always follow the PPE requirements for the specific task.
Ignoring Chemical Labels
Never assume a chemical is safe because you’ve used it before.
Its concentration, formulation, or storage condition may differ from the material you handled previously.
Check the container label and relevant Safety Data Sheet before use.
Confusing Fire Equipment Signs With Chemical Hazard Symbols
A red fire extinguisher sign identifies the location of firefighting equipment.
A GHS flame pictogram identifies flammable chemical hazards.
Both relate to fire safety, but they communicate different information.
Assuming Every Laboratory Uses Identical Signs
Laboratory signage varies according to the applicable regulations, standards, and workplace hazards.
A research laboratory may display laser and radiation warnings. A clinical laboratory may emphasize biohazard and sharps disposal signs.
Always follow the signs and instructions applicable to your facility.
Treating Safety Signs as a Substitute for Training
A symbol cannot explain every precaution required for a complex laboratory procedure.
Workers still need suitable training, risk assessments, and emergency instructions.
Signs support safe behavior. They don’t replace it.
Laboratory Safety Symbols and Their Meanings: Quick Reference Table
The following table provides a convenient overview of common laboratory safety symbols and their meanings.
| Safety symbol | Meaning | Main hazard or instruction |
| Flame | Flammable material | Fire and ignition |
| Skull and crossbones | Acute toxicity | Serious poisoning |
| Corrosion | Corrosive material | Skin burns and eye damage |
| Exploding bomb | Explosive material | Explosion |
| Flame over circle | Oxidizing material | Intensified fire |
| Gas cylinder | Gas under pressure | Pressure-related hazards |
| Health hazard | Serious health effects | Chronic health risks |
| Exclamation mark | Irritant or harmful | Irritation and certain harmful effects |
| Environment | Environmental hazard | Aquatic toxicity |
| Radiation trefoil | Radioactive material warning | Ionizing radiation |
| Lightning bolt | Electrical hazard | Electric shock |
| Laser warning | Laser radiation | Eye and skin injury |
| Hot surface | High temperature | Thermal burns |
| Low temperature | Cryogenic hazard | Cold burns |
| Safety goggles | Eye protection required | Mandatory PPE |
| Protective gloves | Gloves required | Hand protection |
| Lab coat | Protective clothing required | Body protection |
| Face shield | Face protection required | Splash protection |
| Respirator | Respiratory protection required | Inhalation protection |
| Eyewash station | Emergency eyewash | Eye decontamination |
| Emergency shower | Safety shower | Body decontamination |
| First aid | First aid facility | Initial medical assistance |
| Fire extinguisher | Fire equipment location | Fire response |
| Fire blanket | Fire blanket location | Specific small-fire response |
| Emergency exit | Evacuation route | Emergency escape |
| Assembly point | Emergency meeting location | Post-evacuation accountability |
| No smoking | Smoking prohibited | Ignition prevention |
| No open flames | Open flames prohibited | Fire prevention |
| No eating or drinking | Food and beverages prohibited | Contamination prevention |
| Restricted entry | Unauthorized access prohibited | Access control |
Note: The descriptions in this table identify the symbols. Always use official pictograms and applicable signage standards when creating actual safety labels.
Frequently Asked Questions About Lab Safety Symbols
What Are Laboratory Safety Symbols?
Laboratory safety symbols are visual signs and pictograms that communicate hazards, required protective measures, prohibited activities, and emergency information. They help laboratory personnel recognize dangers involving chemicals, biological materials, equipment, and workplace conditions.
What Are the Most Common Lab Safety Symbols?
Some of the most common symbols include:
- Biohazard
- Flammable material
- Toxic substance
- Corrosive material
- Explosive material
- Oxidizing material
- Gas under pressure
- Health hazard
- Radiation warning
- Electrical hazard
- Mandatory PPE
- Emergency eyewash
Each symbol communicates a different hazard or safety instruction.
What Does the Biohazard Symbol Mean?
The biohazard symbol warns about potentially infectious biological materials. It commonly appears on specimen containers, biological waste bins, microbiology laboratory doors, and equipment used to handle infectious materials.
What Are the Different Types of Laboratory Safety Signs?
Laboratory safety signs generally include five main categories:
- Warning signs
- Mandatory signs
- Prohibition signs
- Safe-condition and emergency signs
- Fire equipment signs
Each category communicates a different type of safety information.
What Does the Skull and Crossbones Symbol Mean in a Laboratory?
The skull and crossbones symbol identifies chemicals classified under certain acute toxicity categories. Exposure through inhalation, ingestion, or skin contact may cause severe poisoning or death.
What Does the Corrosive Symbol Mean?
The corrosive symbol warns that a substance can cause severe skin burns, serious eye damage, or corrosion of metals. Strong acids and bases commonly carry this pictogram when they meet the relevant classification criteria.
What Does the Red Diamond on a Chemical Label Mean?
A red diamond-shaped border identifies a GHS chemical hazard pictogram. The black symbol inside communicates a particular hazard, such as flammability, acute toxicity, corrosion, or serious health effects.
What Do Yellow Laboratory Safety Signs Mean?
Yellow laboratory safety signs generally indicate potential hazards. They commonly use triangular shapes with black pictograms to warn about dangers such as electricity, radiation, high temperatures, and low temperatures.
What Do Blue Laboratory Safety Signs Mean?
Blue laboratory safety signs generally indicate mandatory actions. They tell personnel to follow specific requirements, such as wearing safety goggles, protective gloves, lab coats, or hearing protection.
What Do Green Laboratory Safety Signs Mean?
Green laboratory signs generally identify safe conditions and emergency facilities. Common examples include first aid stations, emergency exits, eyewash facilities, and emergency assembly points.
What Are Biosafety Levels 1–4?
Biosafety levels describe laboratory containment requirements for biological work.
- BSL-1: Basic containment for low-risk biological agents.
- BSL-2: Additional precautions for agents associated with human disease.
- BSL-3: Specialized containment for agents that can cause serious disease, particularly through inhalation.
- BSL-4: Maximum containment for particularly dangerous biological agents.
These levels describe laboratory practices and facilities rather than separate warning symbols.
What Is the Difference Between GHS and NFPA 704?
GHS communicates chemical hazards through red diamond-shaped pictograms and detailed chemical labels. NFPA 704 uses a four-color diamond to communicate health, flammability, instability, and special hazards, particularly for emergency responders.
Why Are Laboratory Safety Symbols Important?
Laboratory safety symbols help people identify hazards, follow protective measures, prevent accidents, and locate emergency equipment. They also support workplace safety communication and compliance with applicable regulations.
Where Can You Find Laboratory Safety Symbols?
You can find laboratory safety symbols on chemical containers, laboratory entrances, equipment, storage cabinets, biological waste containers, emergency stations, and restricted work areas.
Their placement depends on the hazard and the information people need before entering or handling something.
Conclusion
Understanding lab safety symbols and their meanings is an essential part of working safely in any scientific environment. These signs help people recognize dangerous chemicals, infectious materials, radiation sources, electrical equipment, and other potential hazards.
From the biohazard symbol to chemical warning pictograms, every sign communicates information that can influence how someone handles a material or responds to an emergency.
However, recognizing a symbol is only the beginning. You should also understand its associated precautions, read chemical labels, consult Safety Data Sheets, and follow your laboratory’s safety procedures.
If you’re studying chemistry, conducting biological research, or working in a clinical laboratory, knowing these symbols helps you make safer decisions every day.
Learn the signs before starting the work. A few seconds spent recognizing a hazard can prevent a serious laboratory accident.

I’m Daniel Brooks, a content creator and symbol enthusiast dedicated to researching the fascinating world of signs and symbols. I enjoy discovering the hidden meanings behind famous icons, emojis, historical emblems, and cultural symbols. Through my writing, I aim to provide trustworthy, well-researched, and reader-friendly information that helps people learn something new with every visit.
Books:
- The Complete Guide to World Symbols
- The Power of Universal Signs
 Mason Ellington
 Nathan Holloway